In this setup guide, I will deploy a MongoDB and Mongo Express application on AWS Kubernetes Cluster (EKS). EKS is a managed Kubernetes service that makes it easier to run Kubernetes on AWS.
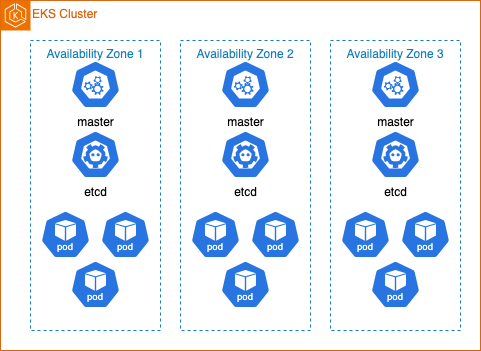
Using EKS offers the following major benefits:
- Pre-install Kubernetes master nodes and other apps like container runtime for you
- Master nodes are managed by AWS so you can focus on worker nodes
- Service are deployed across multiple Availability Zones to ensure high availability
- Automatic scaling by adjusting the number of work nodes in the cluster
Kubernetes (K8s) is an open source platform to deploy, scale and manage containerized applications. Here my setup is to deploy a MongoDB database and Mongo Express application using their docker images from Docker Hub.
Objectives:
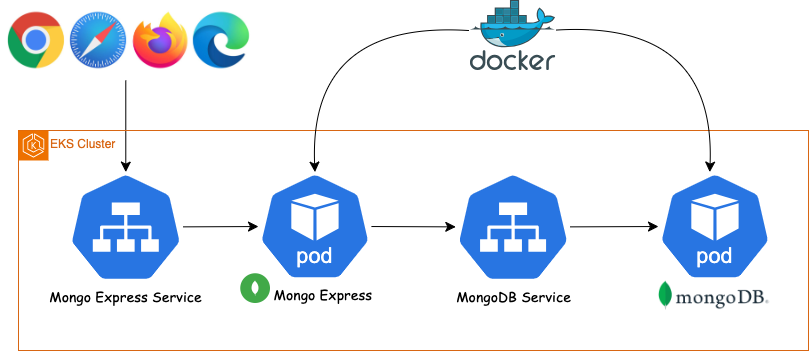
- Create EKS Cluster using
eksctlcommand - Create MongoDB deployment and service using
kubectlcommand - Create Mongo Express deployment and service using
kubectlcommand
Step 1: Install eksctl command
In my previous blog, I already explored how to create an EKS cluster using Terraform. This time I will use an open source CLI tool eksctl to create my EKS cluster. It automatically creates the necessary AWS resources (e.g. VPC, Subnets, Security Group, Node Group, etc.) required with a single command.
This will Install the eksctl command on MacOS.
brew tap weaveworks/tap
brew install weaveworks/tap/eksctl
Prepare a parameter file (eks-cluster.yaml) for creating my EKS Cluster. It contains a node group with two EC2 instances of type t2.micro.
apiVersion: eksctl.io/v1alpha5
kind: ClusterConfig

metadata:
  name: mongo-cluster
  region: ca-central-1

nodeGroups:
  - name: linux
    instanceType: t2.micro
    desiredCapacity: 2
    privateNetworking: true
% eksctl create cluster -f eks-cluster.yaml

Use the following command to check my cluster is created.
% kubectl get nodes
Step 2: Deploy MongoDB
We will be using the latest MongoDB official docker image. There are two environment variables we need to setup MONGO_INITDB_ROOT_USERNAME, MONGO_INITDB_ROOT_PASSWORD and I will store them in a secret file instead of hardcoding in the configuration file.

In order to store the user name and password in a secret configuration file, first we need to encode their values from plain text to base64. For example, my user name is ‘root‘ and password is ‘myrootpassword‘, the commands are as follow.
% echo -n 'root' | base64

cm9vdA==

% echo -n 'myrootpassword' | base64

bXlyb290cGFzc3dvcmQ=
My secrets.yaml looks like this.
apiVersion: v1
kind: Secret
metadata:
    name: mongodb-secrets
type: Opaque
data:
    mongodb-root-username: cm9vdA==
    mongodb-root-password: bXlyb290cGFzc3dvcmQ=
Create the secrets in Kubernetes:
% kubectl apply -f secrets.yaml
% kubectl get secret
Now we can prepare our MongoDB deployment file (mongo.yaml) and reference the user name and password from the Kubernetes secrets.
Explanation:
- image: mongo – name of the docker image
- containerPort: 27017 – standard port no. that Mongo DB server listens on
apiVersion: apps/v1
kind: Deployment
metadata:
  name: eks-mongodb-deployment
  labels:
    app: mongodb
spec:
  replicas: 1
  selector:
    matchLabels:
      app: mongodb
  template:
    metadata:
      labels:
        app: mongodb
    spec:
      containers:
      - name: mongodb
        image: mongo
        ports:
        - containerPort: 27017
        env:
        - name: MONGO_INITDB_ROOT_USERNAME
          valueFrom:
            secretKeyRef:
              name: mongodb-secrets
              key: mongodb-root-username
        - name: MONGO_INITDB_ROOT_PASSWORD
          valueFrom:
            secretKeyRef:
              name: mongodb-secrets
              key: mongodb-root-password
Now we can deploy our MongoDB pod
% kubectl apply -f mongo.yaml
% kubectl get pod
% kubectl describe pod <pod-name>
Next, we will create an internal service for other pods (e.g. Mongo Express) to talk to the MongoDB server we just created.
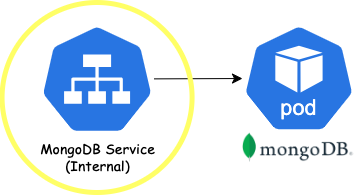
Our MongoDB service file (mongosvc.yaml) looks like this.
Explanation:
- selector: app: mongodb – specify the pod this service will attach to
- targetPort: 27017 – match the container port no. of MongoDB deployment
- port: 27017 – port no. this service listens on
apiVersion: v1
kind: Service
metadata:
  name: mongodb-service
spec:
  selector:
    app: mongodb
  ports:
    - protocol: TCP
      port: 27017
      targetPort: 27017
Now we can create our MondoDB internal service.
% kubectl apply -f mongosvc.yaml
% kubectl get service
To verify the service is attached to the correct MongoDB pod, check the IP and Port no. of our service.
% kubectl describe service mongodb-service
% kubectl get pod -o wide
Here the Endpoints of our service is showing 192.168.83.54:27017, which matches the internal IP address of our MongoDB pod name eks-mongodb-deployment-67f4f7cddf-2hccf
Step 2: Deploy Mongo Express
Mongo Express is a web-based MongoDB admin interface written in Node.js, Express.js and Bootstrap 3. We will prepare a deployment file to deploy this app to our EKS cluster. Again, we are using the official docker image from dockerhub.

There are three environment variables that we need to configure for this app:
ME_CONFIG_MONGODB_ADMINUSERNAMEME_CONFIG_MONGODB_ADMINPASSWORDME_CONFIG_MONGODB_SERVER
We will use the same username and password defined in our MongoDB setup and that are already stored as Kubernetes secrets. We need to tell Mongo Express the database server to connect to by specifying the internal service name (i.e. mongodb-service) in the ME_CONFIG_MONGODB_SERVER variable.
Let’s create a Kubernetes ConfigMap (configmap.yaml) to store this environment configuration.
apiVersion: v1
kind: ConfigMap
metadata:
  name: mongodb-configmap
data:
  database_server: mongodb-service
Create the config map in Kubernetes.
% kubectl apply -f configmap.yaml
% kubectl get configmap
Prepare the deployment file (express.yaml) for Mongo Express.
Explanation:
- containerPort: 8081 – standard port no. that Mongo Express listens on
- configMapKeyRef: name: mongodb-configmap – reference the environment variable from ConfigMap
apiVersion: apps/v1
kind: Deployment
metadata:
  name: eks-mongo-express-deployment
  labels:
    app: mongo-express
spec:
  replicas: 1
  selector:
    matchLabels:
      app: mongo-express
  template:
    metadata:
      labels:
        app: mongo-express
    spec:
      containers:
      - name: mongo-express
        image: mongo-express
        ports:
        - containerPort: 8081
        env:
        - name: ME_CONFIG_MONGODB_ADMINUSERNAME
          valueFrom:
            secretKeyRef:
              name: mongodb-secrets
              key: mongodb-root-username
        - name: ME_CONFIG_MONGODB_ADMINPASSWORD
          valueFrom:
            secretKeyRef:
              name: mongodb-secrets
              key: mongodb-root-password
        - name: ME_CONFIG_MONGODB_SERVER
          valueFrom:
            configMapKeyRef:
              name: mongodb-configmap
              key: database_server
Deploy our Mongo Express pod
% kubectl apply -f express.yaml
% kubectl get pod
% kubectl describe pod <mongo_express_pod_name>
Our final step is to allow access to Mongo Express through browser by creating an external service.

Our Mongo Express service configuration file (expresssvc.yaml) looks like this.
Explanation:
- type: LoadBalance – allows to accept external request by assigning an external IP address
- nodePort: 30000 – port no. for the external IP address to listen on
- targetPort: 8081 – match the container port no. of Mongo Express deployment
- port: 8081 – port no. this service listens on
apiVersion: v1
kind: Service
metadata:
  name: mongo-express-service
spec:
  selector:
    app: mongo-express
  type: LoadBalancer
  ports:
    - protocol: TCP
      port: 8081
      targetPort: 8081
      nodePort: 30000
Deploy our external service for Mongo Express.
% kubectl apply -f expresssvc.yaml
% kubectl get service
An external IP is automatically assigned to the mongo-express-service just created. We can now access the Mongo Express UI from our browser (first login are “admin” for username and “pass” for password).


Clean Up
Resources created in this guide will incur charges if you keep them running. We can easily delete the EKS cluster and all its resources (e.g. EC2 instances, VPC, subnets, node group, etc.) with the eksctl command.
% eksctl delete cluster --name <cluster name>Thank you for reading my article, you can find all the configuration files in my GitHub.

