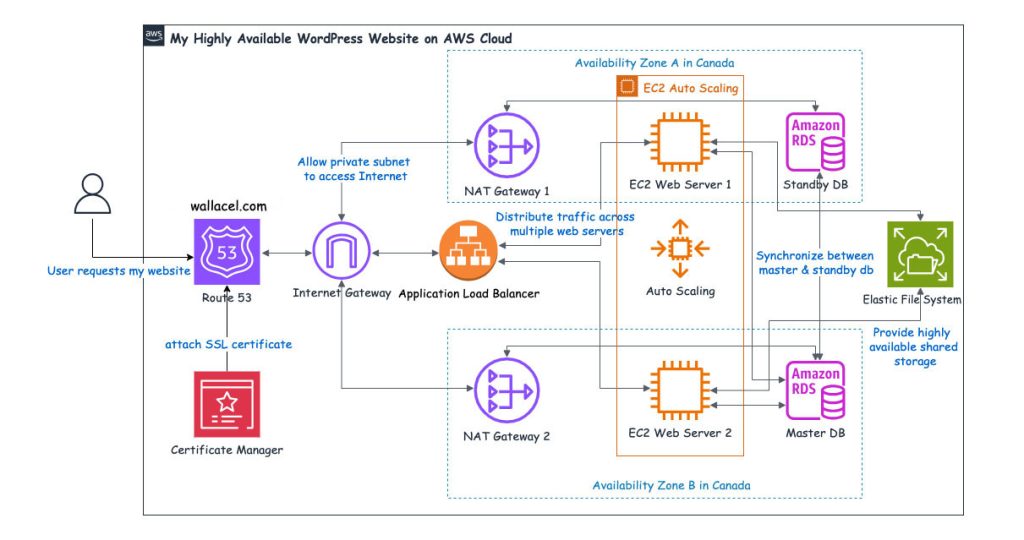
In this AWS project, I create my blog using WordPress and deploy it on AWS using EC2, RDS – MySQL, EFS, VPC, NAT Gateway, Application Load Balancer, Auto Scaling Group, Route 53, Certificate Manager, Systems Manager and IAM.
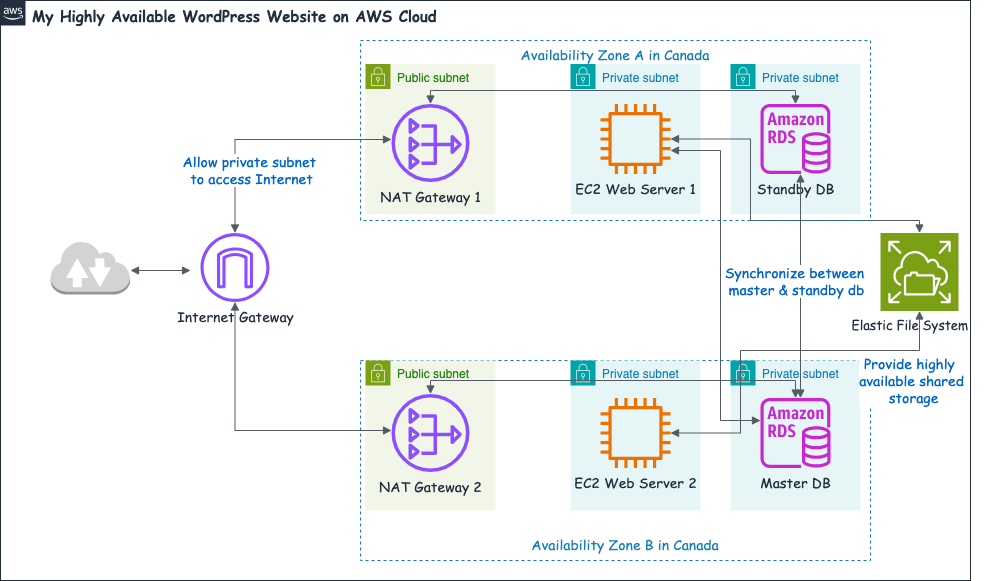
Instead of using CloudFormation to automate the deployment, I decide to build everything from scratch. I start by creating a Virtual Private Cloud (VPC) with two private subnets for the Web tier and Data tier within one Availability Zone (AZ). These subnets will host my WordPress instances and the database. I then create a public subnet and setup a Network Address Translation (NAT) gateway that routes through an Internet Gateway (IG). This configuration provides Internet access to the instances in the private subnets, crucial for software updates and other internet-bound traffic. To ensure high availability and fault tolerance, I duplicate these subnets in another Availability Zone. This means both the Web tier and Data tier have corresponding subnets in a second AZ.

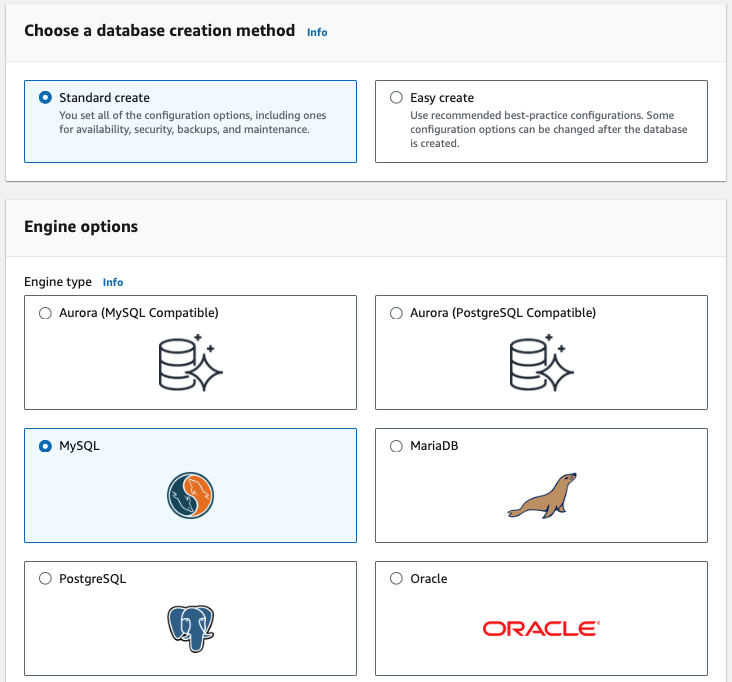
WordPress uses a MySQL database to stores its data, including pages, posts, themes, login credentials and plugins. To manage this efficiently, I utilize Amazon Relational Database Service (RDS) for MySQL. RDS is a fully managed database service that provides a scalable and cost-effective solution for deploying relational database in the cloud. With a Multi-AZ enabled configuration, the primary database resides in one AZ, while a standby replica is maintained in another AZ. This setup provides automatic failover support, enhancing the reliability of my WordPress site by ensuring continuous availability even if one AZ experiences issues.
I need reliable file storage to handle my WordPress application code and configuration files, and essential softwares like Apache and PHP. The storage has to be accessible across multiple servers in two Availability Zones. Using Elastic File System (EFS) proved to be the ideal choice. With EFS, all servers can access the same set of files from a central location, making it easy to scale my WordPress deployment horizontally without worrying about file synchronization or data consistency issues. Plus, EFS offers high availability and automatically adjusts its capacity as needed.
To install WordPress, I start by launching an Amazon Linux 2 AMI EC2 instance and mounting the EFS to it. Then I download and install all necessary softwares like Apache web server, PHP, MySQL8 and lastly the latest WordPress files. This WordPress EC2 instance is deployed in a private subnet (Web tier) and duplicated across the other AZ for redundancy and high availability.
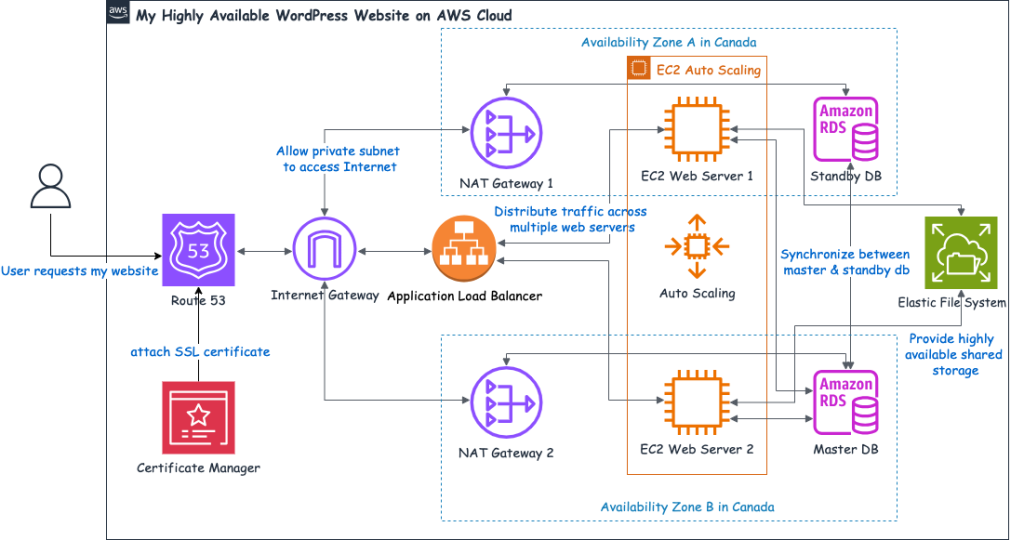
Now that I have two WordPress servers running, I add an Application Load Balancer (ALB) to distribute incoming traffic evenly across these servers. This setup enhances the availability of my blog; if one server goes down, all traffic is automatically routed to the remaining healthy server. Additionally, I configure an Auto Scaling Group (ASG) to scale the number of EC2 instances based on demand. This ensures I always have at least two instances running across different Availability Zones during minimal or zero demand, with the capacity to scale up to four instances during peak load times.

Finally, I register a domain name for my blog in Route 53 and request a free SSL certificate using AWS Certificate Manager. After verifying my domain and completing the SSL certification process, my blog is up and running securely!
Final thoughts
I complete this project after earning my AWS Certified Solutions Architect – Associate Certification. By manually setting up each component instead of using CloudFormation for automation, I gained a deeper understanding of AWS infrastructure, ensure a robust, highly available, and scalable WordPress deployment. This hands-on project reinforced the advantages of cloud computing, such as speed and agility. The ability to deploy my blog globally with just a few clicks was nothing short of amazing. Now equipped with newfound confidence and expertise, I’m excited to leverage these skills in my next adventure.

